Contents
- Upload
- Duplicate Detection, Marking, and Removal
- Search and Label Documents for Review
- Create Labels and Add Metadata for your Documents
- Review and Classify Documents
- Export a Production
Upload
- To begin, upload some files. You can upload and unpack large data sets such as. PST, MSG, EML or ZIP files. Click Upload Documents.

Any type of file can be uploaded and downloaded, subject to permissions and malware checks. The built-in document viewer can handle PDF, DOCX, DOC, XLSX, XLS, CSV, PPTX, PPT, MSG, EML, HTML, TIFF, JPEG, PNG, and DCM (medical images). Additionally, PST and ZIP archives can be uploaded and unpacked within workspaces. - Click Add Files to add individual files or click Add Folders to add entire folders to your workspace. You can also drag and drop your files in the upload modal.

- Select the file(s) or folder(s) you would like to upload and click Open.

- The system will display the list of files to be uploaded. You can add or remove files as needed. When you're ready, please click Upload.

- A progress bar will be displayed to indicate the progress of your upload.

Please note that you cannot add new files to upload or cancel the upload while it is in progress. You can minimise the upload modal while the upload is in progress. - Click the Close button to close the upload modal once the upload is complete.

- When your files have finished uploading, click Unpack.

- The system will unpack your PST file. Its progress will be indicated by the processing doughnut, status and percentage. Hover your mouse over the processing doughnut to view its status. When your PST file has finished unpacking, please refresh the page.
 The system will continue to process the contents of your files.
 - Once your files have been unpacked and fully processed, you can safely remove the PST file from your workspace. This may take a moment, so please make sure no processing doughnuts are present on your PST file before removing it. Tick the box next to your PST file and click the rubbish bin icon to remove it.

A Workspace Admin can prompt the system to automatically identify and mark duplicate documents. These duplicate document titles will be struck-through.
Duplicate Detection, Marking, and Removal - Click Manage Workspace.

- Next, click Duplicate Docs.

- Click Mark all as Exact Duplicates to mark all identical documents.

- You will be redirected back to the documents area while the system marks all exact duplicate documents in the workspace.

- The titles of all exact duplicates will be struck through or hidden depending on your duplicate document setting preferences.

Exact duplicates are documents that share the same MD5 checksum. It is possible for two documents to have the same text, but have a different MD5 checksum. - Return to the manage duplicates screen to view your duplicate document statistics.

Search and Label Documents for Review
You can use the Search Wizard to search for documents by keywords in your workspace. You can build a search string and add more search conditions depending on how specific you would like your results to be. - Click Search.

- Enter your query into the Document Search Wizard text field below. Add additional search conditions by clicking Add another condition.

Click here to view a list of the search conditions available to you. - Next, click Search.

- The system will search your workspace and find documents matching your search parameters. Search Statistics and Match Breakdown are displayed on the panel to the right. You can view a document by clicking the document titles in your Search Results.

- Next, click Tag all matches on the Actions menu to the right.

- Click Create New, enter the name, select the appropriate label type and click Create and Apply.

- In the Documents Area, click Labels on the folder tree, then click the corresponding folder to view all the files you have just tagged.

'Review 1' label has been applied to your search results.Create Labels and Add Metadata for your Documents
Next, create a customised set of fields to add metadata to documents for classification. The document coding app must be enabled in order for this to work. - To turn on the document coding app, click Manage Workspace to view your workspace settings.

- Go to the Apps page and tick the box next to Document Coding.

- Then, scroll to the bottom and click Save.

- The system will direct you back to your workspace's homepage. Next, click Manage Workspace.

- Then click Labels & Metadata.

- On the classification setup screen, you can add a new field or edit an existing field. Click Add a New Field.

- Enter a Field Name.

- Next, select a Field Type. The fields you create will appear on the panel to the left of your document in the Document View.

- Yes/No - [Tag] Creates a tick box to confirm or negate your tag entry. If your entry is ticked, the system will add this tag to your document in the Documents Area.
- Tag - [Tag] This will create a simple tag.
- Text - [Field] Creates a text field on the left panel in the Document View.
- Date - [Field] Creates a date field on the left panel in the Document View.
- Date and time - [Field] Creates a date and time field on the left panel in the Document View.
- Number - [Field] Creates a number field on the left panel in the Document View.
- Rating - Allows you to rate your document
- Tick Show this field in the coding panel?.

- Click Create to create your custom field.

- Follow the process outlined above to create more fields.

Review and Classify Documents
Next, we'll begin the document review! We'll open and classify the set of documents we tagged 'Review 1' - Click Documents to return to the Documents area.

- Click Review 1 in your tags folder.

- Click on the first document to start the classification process.

- Notice, your new classification fields are now present on the panel to the left.

- Classify and add the appropriate metadata to this document and click Next.

Review each document and add the appropriate metadata to your document fields.
Export a Production
Once you have finished your document review, you can produce a production to send to the other side. - Right-click a folder containing the files you would like to export. Select Export and then Export for Production.

- This is the Export for Production screen.

- Next, add some column headers to your production. The column headers you select will determine what data is shown in your production. You can remove columns by clicking the trash bin icon beside the column name. You can add more columns by clicking Add another column.

- You can re-name the column in your production by entering a value in the field below. If you leave an entry blank, the default column name will be used.

In which format would you like to export the documents? - Select which format would you like to export your files. Emails, spreadsheets and other workspace documents have five export options. Encrypted documents can only be exported as native.

- Native if possible, with fallback to PDF - The system will export your file in its original format, or the format in which it was uploaded. If the system cannot export your file in its original format, it will be exported as a PDF.
- PDF if possible, with fallback to native - The system will export your files as PDF documents. If the system cannot export your file as a PDF, it will be exported in its original format.
- Native and PDF, if possible - When applicable, the system will export both, the native file and a PDF version of your workspace files.
- PDF only - The system will export your files as PDF documents.
- Native only - The system will export your file in its original format (the format in which it was uploaded). This is only available to Encrypted documents.
Export Options
- Tick Apply redactions to apply any redactions you or your team has made to your documents.

- Select any documents or sub-folders you do not want to export, but do want to include in the index.

- Next, select the system behaviour when exporting a document or email that has attachments. Click here for detailed information on how the attachments are handled during the production export.

- Only export attachments that explicitly match your selection (eg. tag) - Only export attachments you have selected and marked.
- Export all of your attachments - Export all email attachments.
- Lastly, click Export Index and Documents.

Production
- The system will build your report. When it is finished, tick Download the report to download a copy to your computer, or Save the report into the workspace and select which folder you would like a copy to be saved. Next click Download Report.

- Voila! Here is your production. Click on the .CSV file to view you column headers and corresponding data.
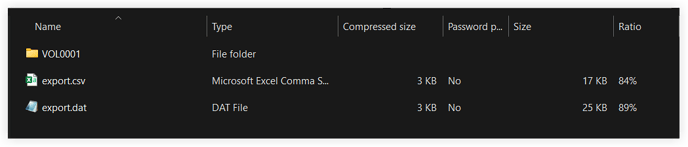
export.csv File
Your production will also include audio files, videos, corrupt files and any unsearchable documents here. - Lastly, here is a set of your documents as either native or PDF files. The document file formats present here will depend on the export settings you selected above.
