
Before you start
You need to be a Workspace Manager with the Edit and Apply Redactions permission in the workspace. If you do not see Remove All Redactions in the Actions panel, ask your Workspace Manager to give you these permissions.
The Redaction app must also be switched on for the workspace. If your Workspace Manager cannot see the option either, ask them to switch on the Redaction app in the workspace settings.
Steps
- Open the top-level Documents folder. In the sidebar, select Document Library. You must be in the root Documents folder, not a subfolder — the option does not appear inside subfolders.
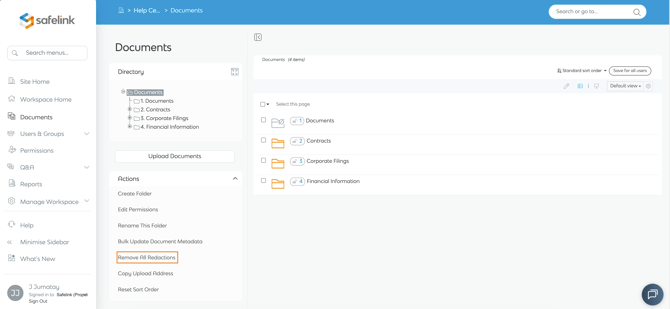
- Choose Remove All Redactions. In the Actions panel on the left, below the folder list, select Remove All Redactions. A confirmation window opens showing how many redactions and exposed areas will be removed, and from how many documents.
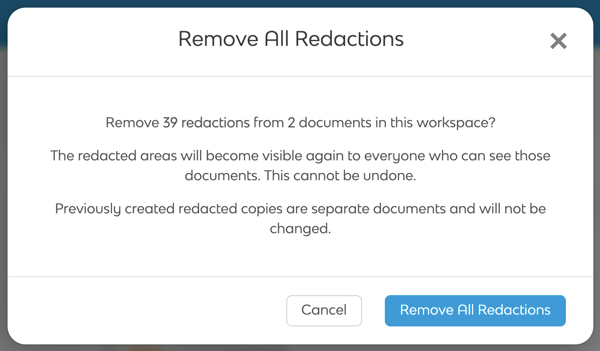
- Review the summary and confirm. Check the counts, then select Remove All Redactions to proceed. If there are no redactions to remove, the window tells you so and you can close it.
What happens next
The removal runs in the background. You will receive an email when it is complete.
All redacted text becomes visible again to everyone who can see those documents. This cannot be undone.
Redacted copies you created earlier are separate documents and are not changed.
The action is recorded in the workspace audit log.
Good to know
- Remove All Redactions is also available by right-clicking the top-level Documents folder in the Directory.
- The action removes redactions and exposed areas made by all users, including those made by users in groups you cannot see.
- Permanently redacted document versions are not affected.
Need help? Please contact our support team at support@safelinkhub.com.